A toilet is one of those appliances that you don’t really appreciate until you lose them. A malfunctioning toilet is not only uncomfortable to deal with but might also end up being the cause of increased expenses. If you have a faulty toilet with a button flush, we hope that you will find this article on how to fix a running toilet with a button flush very useful.
If your toilet has begun malfunctioning, you really don’t have to be afraid. Indeed, the cause of a dripping or running toilet is usually quite easy to fix. You can do it yourself without having to call in the services of a plumber. In this post, we will consider some of the common ways that the toilet can malfunction and the steps that can be taken to solve the problem.
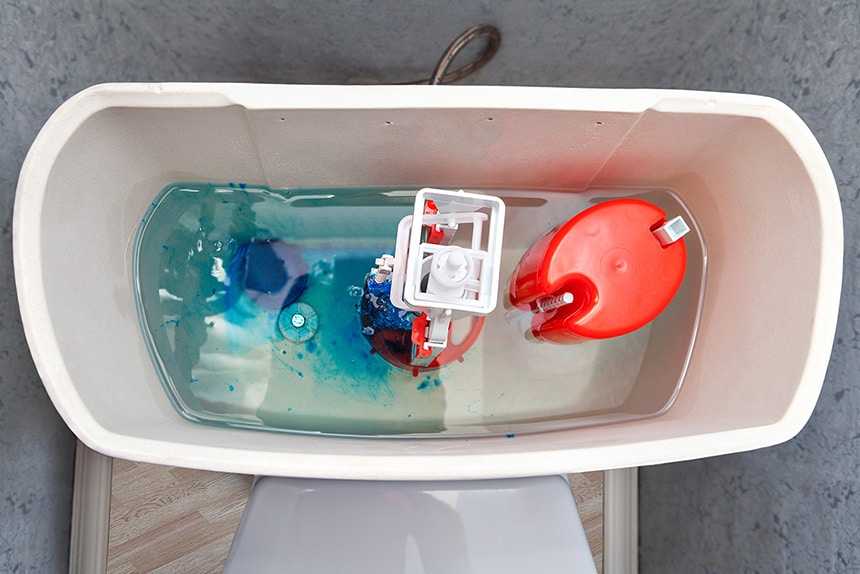
Before you know how to fix the toilet, you need to understand how it works. That is why this section covers the anatomy of the button flush.
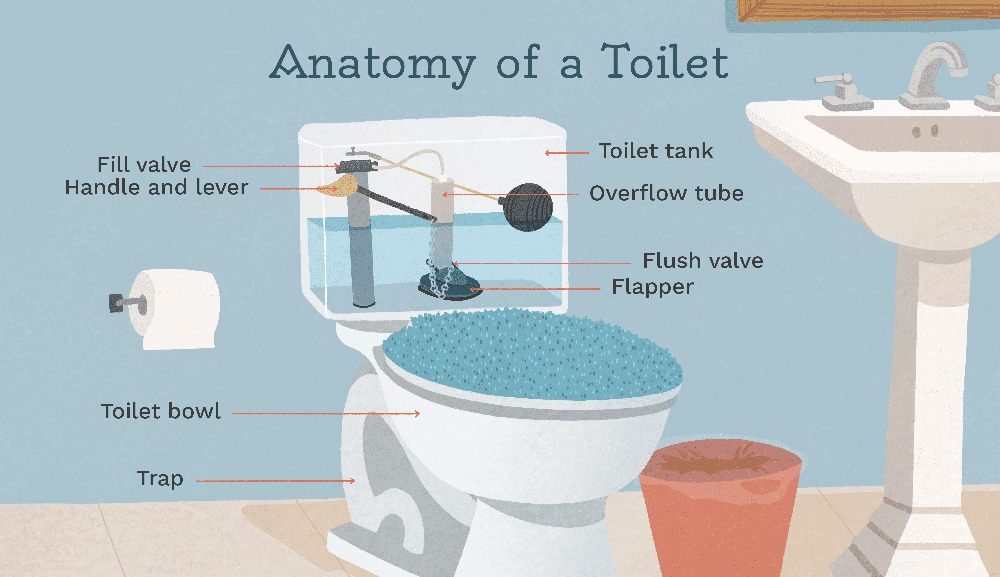
The button flush toilet is similar in several ways to your regular toilet. For example, it has the tank on top with the lid. The physical appearance easily lets you understand how it works. The tank lid has the button on top, and this button is connected to the outlet, also known as the flush valve.
The connection is in such a way that when you press down the button, the tiny pipes under the lid where the button lies on the cover will press down on the flush valve and work to flush the toilet.
Apart from the flush valve, another important component is the overflow pipe. This pipe is a pipe that acts as a marker of the water level in the container. One of its functions is to prevent flooding of the tank. With this overflow pope, the water in the tank remains at a controlled level.
There is also the fill valve Trusted Source Identifying Different Types of Toilet Fill Valves This tutorial describes how to identify what type of fill valve or ballcock you have in your toilet tank. www.thespruce.com . This valve must be at a specific height to the overflow pipe; otherwise, the flush system will not work as it should. When you open the lid, this valve is regulated by the float cup that you see in the system.
For the toilet to flush correctly, the float cup must lie underneath the overflow pipe at all times. If this cup is not beneath the pipe, it can cause flooding and will prevent flushing.
A consideration of the parts of the system will make it easier to solve any problems that are common with this system. Running toilets are due to several factors, although three stand out at this time. All three factors are related to the flush components.
Reviews indicate that the Owfeel button dual-push toilet button is one that offers some of the best hassle-free use for a long time.
If there are issues with your toilet, then you need to check some possible factors. In this section, we will consider what these factors are and what to do if that is the problem.
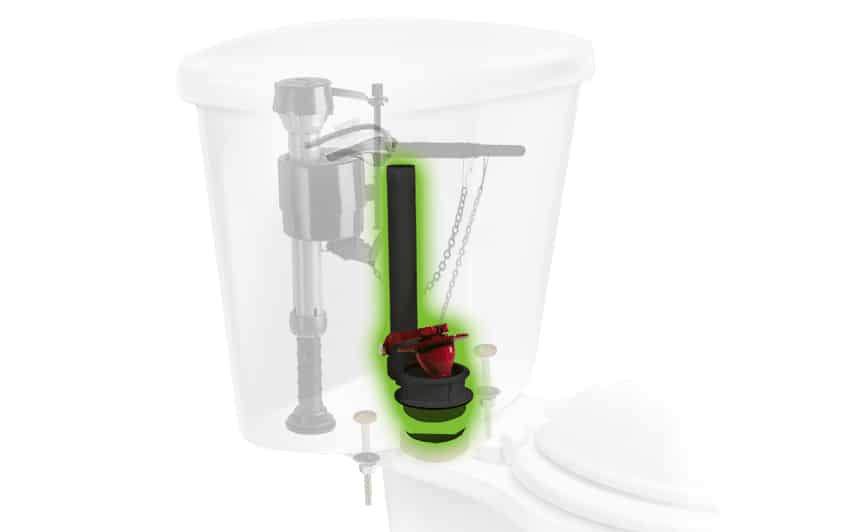
As we have seen in the section above, the flush valve is one of the most important parts of the toilet. The easiest way to know whether the problem lies with the flush valve is to see whether the overflow pipe has water in it to the top. If the pipe has water on a perfect level, then the problem is very likely because of the flush valve.
If that is the case, what can you do? We highlight some of the steps that should be taken in such cases.
After removing the flush valve, the overflow pipe should be visible to you, and you should see that this pipe is properly connected to the flush valve. If water was not draining, the rubber seal in the flush valve might be responsible for that. If this is the case, take note of the following points:
The seal should not be damaged; otherwise, it will not hold the water in the tank. Check out the seal to determine whether it is damaged in any way. If damaged, even if slightly, then that might be responsible for the problem with the toilet.
If the seal is the problem, you will have to change the seal. Fortunately, the seal is easily found in shops and affordable. If you cannot change it right away, you could improvise by using the undamaged side of the seal. But ensure that you change the seal as soon as you can.
What if you have checked and there is no damage to the rubber seal? If there is no damage to the seal, then it could be that the disc that moves with the flush button is damaged. To know whether the disc is good, consider the following:
If, after checking the outlet and the rubber seal and you don’t notice anything, then the flush valve is okay. You will then need to check the inlet, which is also known as the fill valve. How? Let’s see.
If the problem isn’t with the flush valve, then it is likely a faulty fill valve. How do you fix this problem? To know how to fix it, you should know the details about this valve. If the problem is connected to the fill valve, then you have to consider the washers that lie on top of the valve. To that end:
You might want to try to fix the valve without replacing the washer first. Check out the video below explaining how to do just that.
Another thing that might cause problems is the overflow pipe. If the tank fills too quickly and overflows, then the problem is likely with the overflow pipe.
Here are some troubleshooting tips to help you.
To fix this, follow these steps:
There are toilet repair kits that can help with this, including the ForeverPro repair kit that many have reported to be one of the best.
If your toilet suffers from this issue, it is likely because of the buildup of particles, rust, and other debris. These might clog the toilet and restrict water flow into your toilet bowl. Here’s how to solve this problem:
If your tank is always draining, then you can solve the issue by following our tips.
We have written this guide on how to fix a running toilet with a button flush for everyone interested in a little DIY. You can follow these steps and fix your toilet in minutes. If after trying all these and there is no solution, then you might need to check in with your local plumber for help.